Back to Blog
Ski Travel
The Great Race to the Alps - Epic Alpine Routes and Adventure
Leo WinterhartDecember 19, 2025 9 min read
schedule 6–8 hours on trail every day; reserve two chalets for overnight stays; book park entrances ahead.
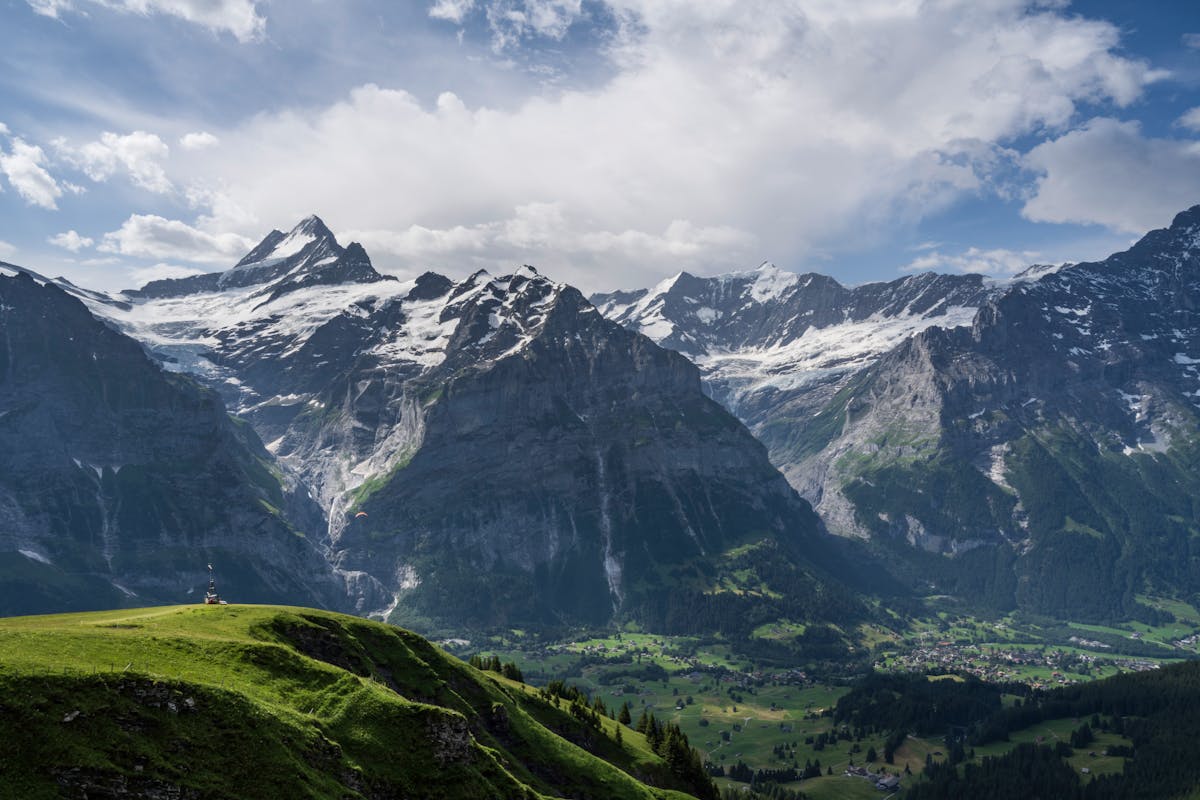
Many journeys unfold beyond crowded paths; going through countryside villages, families enjoy grand chalets, wood-fired evenings, open meadows, serene forests during sunsets for every season.
Access plans include offline maps, weather alerts, basic first aid; while traveling, note thought on choices you might make during forecast updates.
facebook groups serve as quick gauges; compare paths, share tips, receive news from rangers, log progress before each crossing.
During journeys, practical options emerge; never settle for single path; myself, children, plus fellow travelers gain from pacing, rest stops, interactive tasks, grand panoramas beyond crowded viewpoints.
fly into bellegarde airport; take trains toward Nord front; pack a good camera; occupancy stays manageable in half-term mornings; check schedules on website before departure; movement runs smoothly.
Three things to pack: shell jacket, compact charger, small camera lens; remember traditional gear for long hours outdoors; half-term crowds shift occupancy, so choose front carriage seats for easier views.
SNOWCARBON offers practical routes for winter exploring; throughout the journey, terrain shifts from rock shelves to snowfields; change in elevation is gradual, which makes this option enjoyable for varied skill levels; this route becomes a compact loop with a single ascent; bellegarde hub serves as a reliable origin; route becomes a loop that ends near same airport for convenient return; use mobile alerts to track updates, camera ready for dramatic light.
Charlie keeps a log of changes; remember three things: flexible pace, enjoyment of scenery, timely weather checks; occupancy shifts with crowds, so select front seats for better views; during half-term windows, hours of light matter; this yields enjoyable moments behind the camera.
Using mobile planning via website becomes easier with prior registration; change to a simpler route offers good pace for both beginners, seasoned travelers; occupancy monitoring, bellegarde as anchor, Nord corridors, three lightweight logistics tasks help maintain smooth progress throughout half-term; remember to enjoy moment, Charlie's tips inspire an enjoyable, efficient day.
Begin with a starter package for novices: short loop, 6–9 km, 250–450 m gain, start 07:30, finish 11:00. In terms of safety, book a guided option; this speeds up learning, reduces risk, builds confidence for future challenges. Your planning should focus on park access; lunch breaks; trail signage.
Novice path: distance 6–9 km; gain 250–450 m; duration 3–4 hours; surface: steady grade; parking near trailhead; lunch at park cafe; italian option for a quick meal; water breaks every 20–30 minutes.
Intermediate option: 12–18 km; gain 600–900 m; duration 4–6 hours; segments with brief exposure; use fenix edition map; take light rain shell; pack 1 liter water; start earlier to avoid heat.
Advanced route: 20–30 km; gain 1200–1800 m; duration 7–9 hours; suited for solo travel or with a partner; traveling alone requires extra care; multi-day plan recommended if weather turns dark; secure grand backpack with proper gear; choose a full kit approach.
Scheduling notes: reserve slots 2–6 weeks ahead; weekdays mornings offer lighter queue; weekends midday crowds form; to reduce queue, book early; consider a post-visit texts pack with following schedule; theres value in a flexible plan that works solo or with a guide.
Logistics, value: look for a package that includes transport to trailhead, permit where needed, lunch, guide; this 'grand' value reduces friction; This doesnt require heavy gear if plan adequate; queue avoidance by selecting less busy window.
Final tips: prepare a full kit; pack light; know coming weather; italian cafe stop works well; travel with a partner, split tasks; those who practice beforehand finish with more confidence; following these steps gives strong results soon.
Begin with a morning risk check before going out; pick routes rated 1–2; choose a family-friendly course when forecast shows low hazard; this guide helps reduce exposure to high-risk windows.
Weather note: thaw cycles create crusts; after sun breaks, warm afternoons produce surface instability on nord-facing slopes due to shading; wind loading on lee sides yields slabs 40–60 cm thick on exposed ridges; expect several key corridors to host these conditions; add extra caution after strong wind events.
Snowpack parameters: track depth across zones; early season depth 20–40 cm; mid-season 100–200 cm in favored valleys; snow water equivalent (SWE) 40–120 mm on ridge line; deeper pockets possible in sheltered gullies.
Avalanche risk windows: note peak danger after midday thaw, typically between 11:00 and 14:00 local time; late-afternoon cooling reduces risk on crusts, though pockets on sheltered slopes face persistent risk; extra caution applies when wind slabs loaded variable surfaces.
Practical plan: carry beacon, shovel, probe; test slope angles before committing; avoid slopes steeper than 30–35 degrees when danger rating is 3 or higher; need to evaluate skiing routes before return.
Data and field practice: Bellegarde vicinity weather feed launched last season; journeys from nord zones visible on facebook; those updates reach london crews; when planning, move item from pack to harness; damn abrupt shifts can occur; camera teams document crust tests; possible to use these insights to enjoy safer family journeys; vast datasets enhance timely windows.
Recommendation: assemble a modular kit covering bike, skis, protection; keep moving weight under 9 kg; prioritize reliability, value; telegraphtravel notes preparation boosts interest for groups, solo travelers. For each rider, adjust kit by height, weight.
Bike kit: frame 12–14 kg; fork 120–150 mm; wheels 29er tubeless, 2.4 inch front; 2.2 inch rear; drivetrain 1x12; hydraulic brakes; tubeless sealant; spare tube; repair kit; multi-tool; pump; lights; hydration system 1.5–2.0 L; lightweight tool bag; route maps stored offline; durable frame protection; spare inner tube; puncture kit.
Skis: length guidance rider height minus 0–8 cm; core options wood or carbon; mass per ski 1.6–2.0 kg; base waxable; skins for ascent; bindings AT or telemark; transport strap; edge protector; recommended widths 88–105 mm underfoot; different lengths for groups; telegraphtravel notes tests in austria terrain.
Protection: helmet; avalanche beacon; shovel; probe; knee pads; wrist guards; avalanche air bag; first aid kit; goggles; gloves; wind shell; spare batteries; headlamp; beacon test before departure; keep equipment in quick-access pocket; this mitigates risk during transitions; water resistant case helps; crack-test on beacons recommended.
Practical approach: base in austria; maps offline cached; free access; quick reference about terrain; bellegarde stop provides door-step access to backcountry routes; many groups prefer family-friendly lodges; ahead planning reduces risk; weather shifts trigger stops every 60–90 minutes; someone in group takes lead; alone traveler may opt for shorter loops; you can send updates to someone; this practice takes load off mind; door-to-door transfers arranged; stay options exist; footprint stays small with compact kit; just-in-case spare gear kept in dry bag; launched earlier season; interest remains high across groups; residence check-ins recommended; residence address used for lodging coordination; thats why flexible routing matters.
Take compact item pack, map water sources before departure; organize days around daylight to avoid night struggles.
Hydration plan: carry one item bottle plus collapsible spare; lucerne refilling points exist; occupancy in hostels varies; co2e footprint rises with disposable bottles, switch to reusable vessels; drink frequency rises on sunlit stretches; three liters per person daily supports long alpine sections; arriving hikers should refill, restock snacks, avoid waste, carry fewer unneeded items.
Overnight logistics: prebook huts with explicit occupancy caps; skip overcrowding; johnny suggests arrival before dusk; lynsey notes arlberg route check‑in lines peak after arrivals; theyre three main options: refuges, small hotels, camping zones; another option: return to lucerne hinterland lodges; co2e footprint minimized by shared rooms; long stays require dry sacks; made packing list indicates warm layers; enjoyable sunset meals lift morale.
Meal plan: select lightweight staples with high energy density; use zip bags to save space; groups split items to balance tastes; lucerne access to fresh produce possible; doesnt rely on heavy cans; johnny notes improvisation keeps mood high; three quick meal types support alpine days: porridge, cured meat with cheese, dried fruit; drink water after meals to aid digestion; theyre ready to resume soon after rising; lunch breaks in villages deliver fresh bread, olives, soup without long waits.
Tracking metrics: tally item consumption, water drunk, rest duration; occupancy in villages shapes capacity; departure windows from lucerne influence fatigue; co2e footprint rises with longer detours; minimize impact via route choice, pacing, waste reduction; three KPIs: item count, energy expenditure, arrival times; theyre mindful of demand shifts, ensuring supplies flow smoothly; long alpine legs demand flexible pacing; three tips: depart earlier, keep spare shoes dry, monitor co2e impact.
Begin six-week altitude adaptation cycle pairing progressive hypoxic load with endurance work. Baseline metrics: resting heart rate, 5 km pace, and time-to-exhaustion at moderate load. If available, use lucerne as base while awaiting access to higher terrain; otherwise schedule sessions around local hills and stair repeats. editor notes: track results weekly, adjust plan as needed. theres also a focus on sleep quality.